Sunday, March 22, 2009

Crunch!


My mother (bless her heart) backed into the benz the other day. What makes this worse is that we're staying at my parent's place while our kitchen is finished, so we're there as guests. The car was at the bottom of the driveway behind her van. She was trying to get around it. I'll be using Raymond Auto Body as they do the best work in town and are a Certified Mercedes Benz Collision Facility.

Tuesday, March 17, 2009

Front Ball Joints

While I did the brakes, I investigated a "clunk" in the front end. The lower ball joints were done this fall. The uppers need replacing. To diagnose, just take the ball joint betwen the jaws of a LARGE slip-joint pliers and squeeze. Try to pry the joint apart with a large pry bar. If you feel movement, replace the joint. This method works for all sorts of ball and socket joints, i.e. ball joints, sway bar end links, tie rod ends, etc.
These do not seem to be available aftermarket as just the ball joint. Mercedes sells it as a "kit" for $105. Aftermarket, you must purchase the entire joint and Upper Control Arm assembly ($186 - ouch). This looks like an easy job, but the car will need an alignment after they are done...

Front Brakes


The front brakes are just as easy as the rears. First, after installing the Akebono pads, I recommend the Mercedes or other pads that come with a complete set of hardware (clips, etc.). The Akebono pads just come with the pads and wear sensors. I had to clean up all the rest of the hardware with a wire brush. Please read the rear brake post for additional info. on rotor removal, etc.

Disable the SBC system as for the rear brakes. Remove the two 13mm hex head bolts and take off the caliper and hang it with wire from the suspension. Take out the pads. Remove the caliper holder's two 18mm hex bolts. Wire brush everything. Push back the caliper pistons with a LARGE slip-joint pliers or equivalent. Again, I crack the bleader screw (11mm hex) and push the fluid out the bleeder screw instead of sending possibly contaminated fluid up into the SBC unit. Refit the round piston "shim".

Clean the hub with a stiff wire brush. You might need a little sandpaper to remove some of the accumulated rust. Rub silicone gasket compound onto the hub flange to prevent future corrosion. Install the rotors. Apply blue Loctite to and torque the small rotor bolt to 8 Nm. Pull the slide pins out of the caliper bracket one at a time so they are sure to get put back in the right place- they are different. Apply silicone grease liberally to the stainless pins and then reinstall them, making sure to grease the rubber seal arount the pin. If water gets in here it can make the slides stick and cause uneven brake pad wear of the inner vs. outer pad (see rear brakes and the picture at right where the inner pad went metal-on-metal and there is a great deal of pad left on the outer). Install the caliper brackets, apply blue Loctite and torque the bolts to 115 Nm. Apply a thin layer of silicone grease to the caliper where the stainless pad shims fit in. Make sure to keep the grease off of the rotors. Fit the shims. Fit the pads. The wear sensors are pretty straightforward as they have different shaped connectors so it is obvious which belongs on which side of the car.


Here is where things get a bit tricky. Be VERY careful when you slide the brake piston assembly back over the new pads. Now that you have pushed back the piston, the rubber piston seal is a bit floppy. There is a possibility that it could get caught between the piston and inner pad when you slide the piston assembly back over the pads. This would be VERY bad as it would rip the seal and necessitate the installation of a rebuilt caliper. $$$$$ :( Silicone gasked material is not neccessary as the front brake pads have a backing material already applied to them.


Loctite and torque the slide pin bolts to 27 Nm. You're done! Reactivate the SBC as per the instructions in Rear Brakes.


Again, take your time. Don't rush. I know all these people on the Forums say they do their brake pads front and rear in an hour, but we're shooting for excellence here.

Friday, March 6, 2009

Rear Brakes

I went with Akebono ceramic pads and Balo (OEM) rotors from 
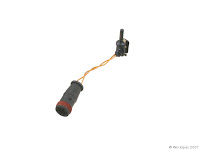
egermanparts. I haven't used ceramic pads before so we'll see how they perform. The brake wear sensor I ordered (gray) was incorrect. The correct sensor is the one spec'd for the right front caliper right pad (black). It is not necessary to change the parking brake shoes.

It is necessary to disable the SBC (Sensotronic Brake Control) brake system to do brake work.

  1. Make sure your parking brake is off (It'll be impossible to remove your rear rotors if it's on)
  2. open driver's side window

  3. turn headlights to 0 position

  4. lock and wait 30 sec. or more

  5. unlock and wait 15 sec. or more

  6. lock


DO NOT UNDER ANY CIRCUMSTANCE UNLOCK THE CAR


If you do this, it will activate the electronic braking system, pressurizing the brake hydraulic lines and push the brake pistions all the way out and require a visit to the dealer- we're trying to avoid that by doing our own brakes ;)


  1. Yes, you can just unplug the SBC connector in the engine compartment on the passenger side just behind the headlight (red circled item), but then the pads will not go though their automatic seating procedure. Don't be lazy. Do things right.

Remove the rear lug nuts (17mm hex). Remember to "break" them before raising the car. Next, use a Torx T40 socket to remove the stainless caliper slide pins. Push the pins back out of their rubber sleeves and pull off the caliper. Hang it with wire from the suspension to avoid stressing the rubber brake line. Remove the two 18mm hex head bolts from the caliper mount. Remove the Torx bolt that holds the rotor to the hub. Get out a LARGE hammer and whack the rotor around the bolt holes. After a bit of heavy-hitting, start whacking on the edge of the rotor. Don't worry, you can't break anything and you're replacing the rotors anyway.

Clean up everything with a stiff wire brush. Make sure to clean the slide pins with Scotchbrite. Make sure they shine. I spray the new rotors down with 409 and then rinse them. After that I give them a good dousing of brake cleaner. Adjust the parking brake shoes with the toothed wheel so that they just touch the inside of the rotors. Put on the rotors, torque the small rotor bolt to 8 Nm. Put blue (medium strength) Loctite on the threads. Mercedes specifies replacing this bolt, but I think that's unnecessary. I rub silicone gasket maker on the part of the hub that meets the inside of the brake rotor to prevent corrosion and make the rotors easier to remove next time. Reinstall the caliper hanger and torque its two 18mm hex head bolts to 115 Nm. Again, use blue Loctite on the threads. Mercedes specifies replacing these bolts, but again, I think this is unnecessary if you are following proper torquing procedures. Push the piston back with a pry bar or LARGE channel lock pliers. I crack the bleeder screw (11mm) and drain the excess fluid out to prevent any contaminants that may be present in the fluid from being pushed back up into the SBC unit. Install the pads with a bit of silicone gasket maker on the back of each pad where it contacts the caliper. This helps prevent brake squeal. Grease the slide pins with silicone grease and make sure they slide easily through their rubber sleeves. Apply blue Loctite and torque them to 27 Nm.

Refit your wheels torquing to 130 Nm. NO Loctite on these :) Follow the procedured for reactivating the SBC system and seating the pads. Note: you need to have the driver's side F and R wheels off of the ground. I just put my car up on 4 jack stands.


  1. Unlock car

  2. turn key to ON

  3. turn key off for 1-5 sec.

  4. turn key on

  5. rotate LR wheel forwards for 1-2 rotations over ~3 sec.

  6. rotate LF wheel forwards until it brakes itself

  7. wait until the corner lights flash 3-5 times (the car will make some noise)

  8. turn ignition off

  9. Start the car

  10. Press brake pedal 5-10 times


If you get a fault message, repeat the above routine.

This is not a hard job. Take your time and do things right. Set aside at least 4 hours to do this job. You can always celebrate if you finish early.

Give Me a Brake!

Both the Mercedes dealership and my local shop have been telling me that my rear brakes needed to be done. Well, I have been putting it off until the brake pad sensor tripped as I saw no need to do the brakes before they needed to be done. It turns out that the rears do need to be done, but the fronts are now metal to metal- no pad left- and are grinding horribly and now I only have parts for the rears. GRRRRRR!!!!

Why did TWO shops miss this? Because they didn't look. Pads sometimes wear unevenly (the iner pad wears before the outer) when the slides are stuck. The slides are stainless pins that the caliper "floats" on. See How Stuff Works for a rundown. If the slides stick, the piston side of the caliper does most of the work and that pad wears more. Both shops didn't bother to look at the inner brake pad. The just looked at the outer. The outer pads still have 1/8" of brake pad left

Stuck slides are a piece of cake to fix. You pull out the stainless pins and clean them with either Scotchbrite or a wire wheel. You then lube them with silicone grease and reinstall them in their rubber sleeves.